Cleaning your ice maker might not be at the top of your to-do list, but it’s more important than you think. Over time, ice makers can gather grime, bacteria, and mineral deposits that not only affect ice quality but could also pose health risks. Luckily, cleaning your ice maker isn’t as daunting as it sounds. With a few simple steps, you can keep it running smoothly and ensure your ice is always fresh and tasty. Here’s how to clean ice makers like a pro!
Quick Summary
- Regular cleaning prevents bacteria and mold growth.
- Clean your ice maker every six months for best results.
- Use a mix of warm water and vinegar for an effective cleaning solution.
- Don’t forget to unplug your ice maker before starting the cleaning process.
- Pay attention to removable parts; they need a good scrub too.
- Rinse thoroughly to avoid any cleaning solution residue.
- Keep an eye on water quality to maintain ice taste.
- Consider professional cleaning if you notice persistent issues.
Table of Contents
Importance Of Ice Maker Cleaning
We often overlook the importance of cleaning our ice makers, but it’s a step we really shouldn’t skip. A clean ice maker isn’t just about having clear ice; it’s about our health, the longevity of the appliance, and the overall quality of what we’re putting in our drinks. Let’s explore why this task is so important.
Health Risks Of Dirty Ice Makers
Dirty ice makers can become breeding grounds for mould, bacteria, and other nasty stuff. These contaminants can end up in our ice and, consequently, in our drinks. This can lead to various health issues, from mild stomach upsets to more serious illnesses. It’s definitely not something we want to risk, especially when it’s so easily preventable with regular cleaning. We need to consider the impact of hard water on our ice makers.
Impact On Ice Quality
Have you ever noticed your ice tasting a little off? Or maybe it’s cloudy or has a weird texture? That’s often a sign that your ice maker needs a good cleaning. The buildup of minerals and other impurities can significantly affect the taste, clarity, and overall quality of the ice. Clean ice is not only more appealing, but it also ensures that it doesn’t negatively impact the flavour of our beverages.
Effects On Machine Longevity
Neglecting to clean our ice maker can lead to more than just bad-tasting ice; it can also shorten the lifespan of the machine. Mineral buildup and grime can cause the components to work harder, leading to breakdowns and costly repairs. Regular cleaning helps to keep everything running smoothly, preventing unnecessary wear and tear and extending the life of our ice maker.
Preventing Bacteria Growth
Ice makers provide a dark, damp environment that’s perfect for bacteria to thrive. Regular cleaning disrupts this environment, preventing the growth of harmful bacteria and keeping our ice safe to consume. It’s a simple step that can make a big difference in our health and well-being.
Avoiding Mineral Buildup
Hard water can leave mineral deposits inside our ice makers, which can affect performance and ice quality. Cleaning helps to remove these deposits, preventing them from accumulating and causing problems. Using a water filter can also help to reduce mineral buildup, but regular cleaning is still necessary to keep everything in top shape.
Enhancing Ice Taste
Clean ice simply tastes better. When we remove the buildup of minerals, mold, and bacteria, we’re left with pure, refreshing ice that enhances the flavor of our drinks. It’s a small detail that can make a big difference in our overall enjoyment.
Here’s a simple cleaning schedule we can follow:
- Every 3 months: Deep clean the entire ice maker.
- Monthly: Wipe down the interior surfaces.
- Weekly: Check for any visible signs of buildup or contamination.
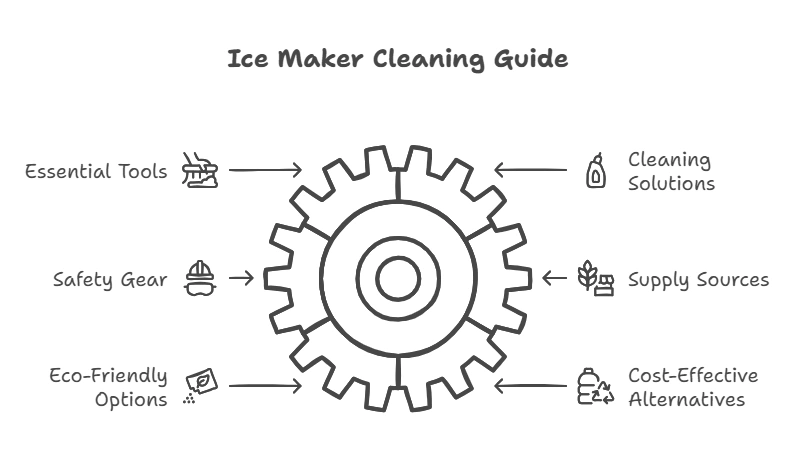
Gathering Your Cleaning Supplies
Before we even think about touching that ice maker, we need to get our ducks in a row. Having the right supplies not only makes the job easier but also ensures we’re cleaning effectively and safely. Trust me, you don’t want to be halfway through and realize you’re missing something! Let’s break down what we need.
Essential Cleaning Tools
Okay, so what tools are we talking about? Think simple. We’ll need a couple of clean microfiber cloths – these are great because they don’t leave lint behind. A soft-bristled brush, like an old toothbrush, can be super handy for getting into those tight corners and crevices. A sponge is also useful for general wiping. And, of course, a bucket or large bowl is used to mix our cleaning solution. Having these basics on hand will make the whole process smoother.
Recommended Cleaning Solutions
Now, for the cleaning solutions. White vinegar is our best friend here. It’s natural, effective, and safe for use in appliances that come into contact with food. You can also use a mild dish soap, but make sure it’s thoroughly rinsed afterward. For tougher buildup, some people swear by a diluted bleach solution, but we need to be extra careful with that – proper dilution and rinsing are key. Or you can use a specialized ice machine cleaner for the job.
Safety Gear To Use
Safety first, always! Even though we’re using relatively mild cleaning agents, it’s still a good idea to protect ourselves. Wear rubber gloves to keep your hands clean and prevent any irritation from the cleaning solutions. If you’re using bleach, consider wearing eye protection to avoid any accidental splashes. And make sure the area is well-ventilated, especially if you’re using stronger cleaners.
Where To Find Supplies
Most of these supplies can be found right in your kitchen or at your local grocery store. Microfiber cloths, brushes, and cleaning solutions are readily available. For specialized ice maker cleaning solutions, you might need to check out a hardware store or appliance retailer. Don’t overthink it – we’re not performing surgery here, just a simple cleaning!
Eco-Friendly Options
If you’re like me and try to be mindful of the environment, there are plenty of eco-friendly options available. White vinegar is a great start. Look for plant-based dish soaps and avoid cleaners with harsh chemicals. You can even find reusable microfiber cloths to cut down on waste. Every little bit helps!
Cost-Effective Alternatives
Cleaning doesn’t have to break the bank. White vinegar is incredibly cheap and effective. Instead of buying expensive cleaning brushes, repurpose an old toothbrush. And those microfiber cloths? You can find them in bulk for a reasonable price. The key is to be resourceful and use what you already have on hand.
Remember, the goal is to clean your ice maker effectively without spending a fortune or harming the environment. A little preparation goes a long way!
Preparing for Clean Ice Makers
Before we jump into the nitty-gritty of cleaning, it’s important to prep our ice maker. This not only makes the cleaning process easier but also ensures our safety and the longevity of the appliance. Let’s walk through the steps together.
Turning Off The Machine
First things first, we need to turn off the ice maker. This seems obvious, but it’s a crucial step for safety. Make sure the power switch is in the “off” position before proceeding. This prevents any accidental start-ups during cleaning.
Unplugging The Appliance
Next, unplug the ice maker from the power outlet. This is another essential safety measure to prevent electric shock. Don’t skip this step! We don’t want any surprises while we’re working.
Removing Ice And Water
Now, let’s get rid of any ice that’s currently in the ice maker. We can toss it in the sink or use it to chill our drinks (if it’s still clean, of course!). Also, if there’s any standing water in the reservoir, we’ll need to drain that as well. This prevents the cleaning solution from being diluted and ensures a more effective cleaning.
Taking Out Removable Parts
Most ice makers have removable parts like the ice bin, scoop, and sometimes even water filters. Take these out and set them aside. This allows us to clean them separately and more thoroughly. Plus, it gives us better access to the interior of the ice maker.
Checking For Damage
While we’re prepping, let’s take a quick look for any signs of damage. Check for cracks, leaks, or any other issues that might need attention. Addressing these problems early can prevent bigger headaches down the road. If we spot something serious, it might be worth calling a professional.
Reading The Manual
Finally, let’s not forget the manual. It might seem boring, but it often contains specific instructions or recommendations for cleaning our particular model of ice maker. It’s always a good idea to give it a quick read before we start. We might discover some helpful tips or warnings that we wouldn’t have known otherwise.
Taking the time to properly prepare our ice maker ensures a safer and more effective cleaning process. It also helps us identify any potential issues early on, preventing future problems and extending the life of our appliance.
Draining The Water Reservoir
It’s time to get that water out! This step is super important because you don’t want to mix old water with your cleaning solution. Plus, getting rid of any lingering water helps prevent mineral buildup. Let’s walk through how we do it.
Locating The Drain Plug
First things first, we need to find that drain plug. Usually, it’s located at the bottom or back of the ice maker. Check your user manual if you’re having trouble spotting it. It might be hidden behind a panel or require a tool to access. Knowing where it is will make the whole process smoother. Once you locate it, you’re one step closer to cleaning the ice maker.
How To Drain Effectively
Okay, now that we’ve found the plug, let’s drain this thing. Place a bucket or container underneath the drain to catch the water. Slowly remove the plug, being careful not to spill. Let all the water drain out completely. This might take a few minutes, so be patient. Make sure you have a good grip on the plug so you don’t drop it!
Cleaning The Drain Area
While the reservoir is draining, take a moment to clean around the drain area. Use a damp cloth to wipe away any dirt or grime that might have accumulated. A little baking soda paste can help with stubborn stains. Keeping this area clean helps prevent future clogs and keeps things sanitary.
Preventing Clogs
To keep things flowing smoothly, let’s think about preventing clogs. Avoid pouring anything other than water and approved cleaning solutions into the reservoir. Regularly check the drain for any debris. You can also flush the drain with a bit of vinegar every few months to dissolve mineral deposits. A little prevention goes a long way!
Checking For Residue
Once the water has drained, take a peek inside the reservoir. Are there any signs of residue or buildup? If so, use a soft brush or cloth to gently scrub the interior. A mix of water and vinegar works wonders for removing stubborn deposits. Rinse thoroughly to remove any traces of the cleaning solution.
Disposing Of Waste Water
Finally, let’s talk about getting rid of that wastewater. Pour the water down the drain, being mindful of any cleaning solutions you use. If you use a harsh chemical, check your local regulations for proper disposal methods. Rinse out your bucket or container, and you’re all set for the next step!
Wiping Down The Interior Surfaces
Creating A Cleaning Solution
Okay, so we’ve got our supplies ready, and the ice maker is prepped. Now, let’s mix up our cleaning solution. I usually go with a simple mix of equal parts white vinegar and water. It’s effective and doesn’t leave behind any harsh chemical smells. You can also use a diluted baking soda solution if you prefer something even milder. Just make sure whatever you use is food-safe, since it’s going to be in contact with the ice we’ll eventually be consuming.
Using The Right Cloth
When it comes to wiping down the interior, the type of cloth we use matters. Microfiber cloths are my go-to because they’re super absorbent and won’t leave any lint behind. Avoid using anything abrasive, like steel wool or scouring pads, as they can scratch the interior surfaces. A soft sponge can also work well, especially for getting into those tighter spots. Just make sure it’s clean!
Focusing On Hard-To-Reach Areas
Alright, time to get into the nitty-gritty. The interior of an ice maker can be a bit of a maze, with all sorts of nooks and crannies where grime likes to hide. Pay special attention to the ice-making tray, the water inlet valve, and any corners or seams. A small brush, like an old toothbrush, can be super helpful for scrubbing those hard-to-reach areas. Don’t forget the dispenser chute either – that’s a prime spot for buildup.
Removing Stains And Buildup
Sometimes, you’ll encounter stubborn stains or mineral buildup that just won’t budge with a simple wipe-down. For these situations, I like to let the cleaning solution sit for a few minutes to help loosen the grime. You can also try making a paste of baking soda and water for a little extra scrubbing power. Just be gentle and avoid scratching the surfaces. If all else fails, a specialized ice machine cleaner might be necessary, but always follow the manufacturer’s instructions.
Rinsing The Interior
After we’ve wiped down all the interior surfaces, it’s crucial to rinse everything thoroughly with clean water. We don’t want any lingering cleaning solution contaminating our ice. Use a spray bottle or a clean cloth to rinse every nook and cranny, making sure to remove all traces of vinegar or baking soda. This step is super important for optimal performance and taste.
Drying The Surfaces
Finally, let’s dry the interior surfaces to prevent any water spots or mildew from forming. A clean, dry microfiber cloth works great for this. Pay attention to those hard-to-reach areas again, making sure to soak up any excess moisture. You can also leave the ice maker door open for a little while to allow it to air dry completely. This helps prevent any musty smells from developing.
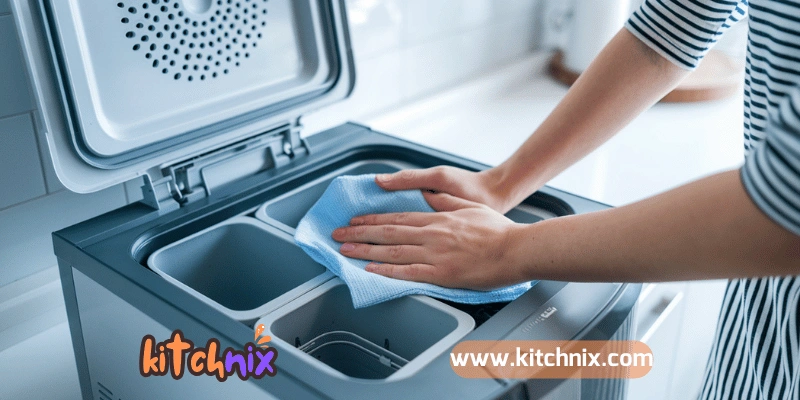
Cleaning The Removable Parts
Soaking The Ice Basket
We usually start by removing the ice basket. It’s surprising how much gunk can accumulate in there! We fill the sink with warm, soapy water and let the basket soak for about 20-30 minutes. This helps loosen any stubborn buildup. For a deeper clean, consider using a solution of baking soda and water to help neutralize odors and remove stains.
Scrubbing The Scoop
Don’t forget the ice scoop! It’s easy to overlook, but it comes into direct contact with your ice. We give it a good scrub with a soft sponge and dish soap. Make sure to get into all the nooks and crannies. We’ve found that a toothbrush can be helpful for those hard-to-reach spots.
Cleaning The Water Pan
The water pan, if your ice maker has one, can also harbor bacteria and mineral deposits. We remove it carefully and wash it thoroughly with warm, soapy water. If we notice any mineral buildup, we might soak it in a vinegar and water solution for a bit before scrubbing. It’s important to ensure the water pan is completely clean to prevent contamination of your ice.
Rinsing And Drying Parts
After scrubbing all the removable parts, we rinse them thoroughly under running water to remove any soap residue. It’s crucial to get rid of all traces of soap, as it can affect the taste of your ice. We then let the parts air dry completely on a clean towel before reassembling the ice maker. Proper drying prevents mold and mildew growth.
Inspecting For Wear
While the parts are drying, we take a moment to inspect them for any signs of wear and tear. Look for cracks, chips, or damage that could affect their performance. If we find anything concerning, we make a note to replace the part as soon as possible. Regular inspection can prevent bigger problems down the road.
Reassembling After Cleaning
Once all the parts are completely dry, we carefully reassemble them into the ice maker. We make sure everything fits snugly and securely. Before turning the ice maker back on, we double-check that all the components are in their correct positions. This ensures the machine operates efficiently and safely.
Cleaning the removable parts of your ice maker is a simple yet important step in maintaining its cleanliness and performance. By following these steps regularly, you can ensure that your ice is always fresh and free from contaminants.
Here’s a simple table for quick reference:
| Part | Cleaning Method | Frequency |
|---|---|---|
| Ice Basket | Soak and scrub with soap | Monthly |
| Ice Scoop | Scrub with soap | Weekly |
| Water Pan | Soak and scrub with soap/vinegar | Monthly |
Cleaning The Exterior Of The Ice Maker
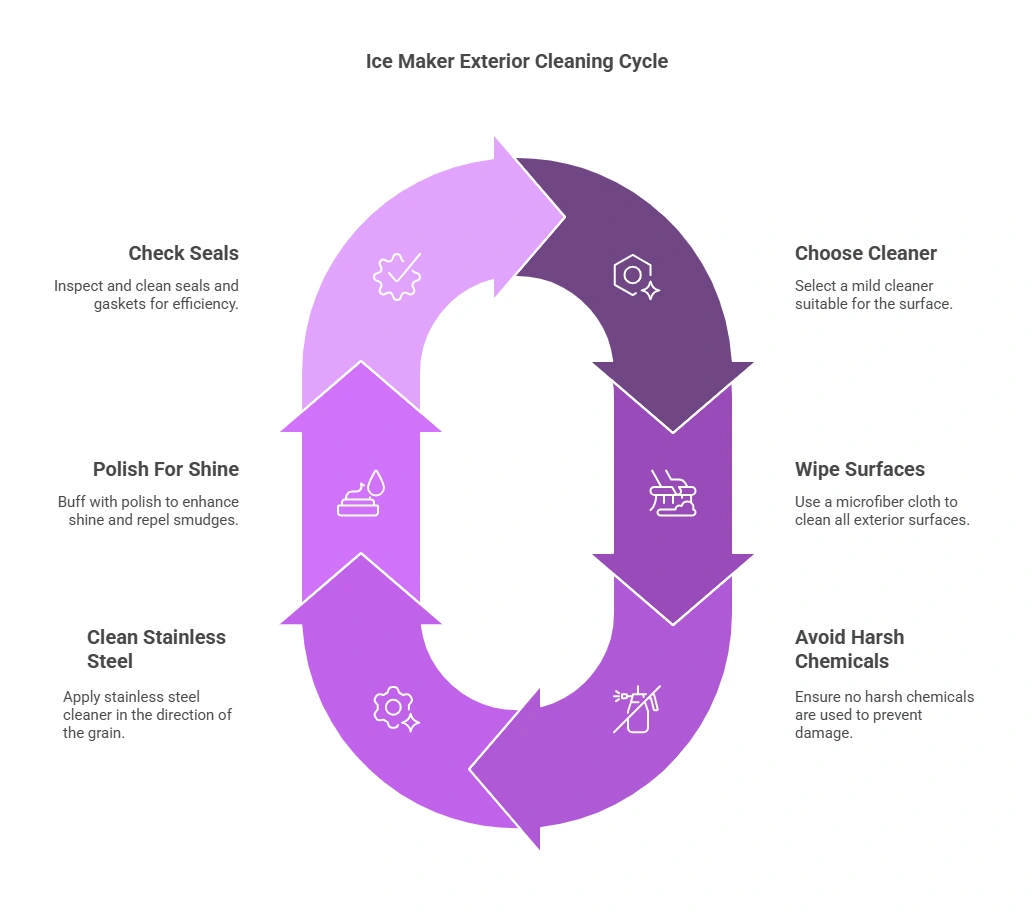
Choosing The Right Cleaner
When it comes to cleaning the outside of your ice maker, we’ve found that using the right cleaner makes all the difference. Avoid anything too harsh; we’re not trying to strip paint or damage the finish. A mild dish soap mixed with warm water usually does the trick. For stainless steel, a cleaner specifically designed for stainless steel is your best bet to prevent streaks and keep it looking shiny. We always test a small, inconspicuous area first to make sure there are no adverse reactions.
Wiping Down Surfaces
Okay, so we’ve got our cleaner ready. Now, let’s get to wiping! We like to use a soft microfiber cloth because it’s gentle and won’t scratch the surface. Dampen the cloth with your cleaning solution and start wiping down all the exterior surfaces. Don’t forget the top, sides, front, and any handles or buttons. Pay extra attention to areas that get touched a lot, as these tend to accumulate more grime. After wiping with the cleaning solution, we use a clean, damp cloth to rinse off any soap residue.
Avoiding Harsh Chemicals
We cannot stress this enough: harsh chemicals are a no-go! Abrasive cleaners, bleach, and ammonia can damage the finish of your ice maker, leading to discoloration, scratches, or even corrosion. These chemicals can also leave behind residue that could potentially contaminate your ice. Stick to mild, gentle cleaners, and always dilute them properly. Your ice maker (and your ice) will thank you for it.
Cleaning Stainless Steel
If your ice maker has a stainless steel exterior, you’ll want to take extra care to keep it looking its best. Here’s what we do:
- Use a stainless steel cleaner specifically formulated for appliances.
- Always wipe in the direction of the grain to avoid streaks.
- Apply the cleaner to a microfiber cloth, not directly onto the appliance.
- Buff the surface with a clean, dry cloth to bring out the shine.
We’ve found that a little elbow grease goes a long way when cleaning stainless steel. Regular cleaning prevents buildup and makes it easier to maintain that sleek, shiny look.
Polishing For Shine
To really make your ice maker shine, consider using a stainless steel polish after cleaning. We apply a small amount of polish to a clean microfiber cloth and buff the surface in a circular motion. This helps to remove any lingering streaks and adds a protective layer that repels fingerprints and smudges. Just be sure to follow the instructions on the polish, and don’t overdo it – a little goes a long way. This is a great way to maintain your ice maker’s appearance.
Checking Seals And Gaskets
Don’t forget to check the seals and gaskets around the ice maker door or lid. These areas can accumulate dirt, mold, and mildew over time. We use a soft brush or cotton swab dipped in a mild cleaning solution to gently scrub these areas. Rinse with a damp cloth and dry thoroughly. Damaged or worn seals and gaskets can lead to leaks and reduced efficiency, so it’s important to keep them clean and in good condition. If you notice any cracks or tears, consider replacing them.
Using A Cleaning Solution Effectively
Choosing The Right Solution
When it comes to cleaning your ice maker, the solution you choose matters. We’ve found that using a cleaner specifically designed for ice makers is the best approach. These cleaners, like the Affresh® Ice Machine Cleaner, are formulated to remove mineral buildup and grime without leaving harmful residues. While some people opt for vinegar solutions, commercial cleaners often provide a more thorough and reliable clean. Always check your ice maker’s manual for recommended cleaning solutions to avoid damaging the appliance.
How Much To Use
Getting the amount of cleaning solution right is key. Too little, and you won’t effectively clean the machine; too much, and you risk leaving residue behind. We generally follow the manufacturer’s instructions on the cleaning solution packaging. For example, if you’re using affresh ice machine cleaner, you’ll want to use the entire bottle, then add water. If you’re using a homemade solution, be sure to measure carefully.
Pouring Into The Reservoir
Pouring the cleaning solution into the reservoir is a straightforward step, but it’s important to do it correctly. First, locate the water reservoir in your ice maker. Then, carefully pour in the measured amount of cleaning solution. If your machine has a water pan instead of a reservoir, pour the solution there. Make sure not to overfill it. We always double-check the manual if we’re unsure where to pour the solution.
Running A Cleaning Cycle
Running a cleaning cycle is crucial for circulating the solution and removing buildup. Most ice makers have a dedicated cleaning cycle, which you can activate by following the manufacturer’s instructions. If your machine doesn’t have a cleaning cycle, simply run a normal ice-making cycle. We usually run at least two cycles to ensure the solution reaches all parts of the machine.
Disposing Of Cleaning Ice
After running the cleaning cycle, you’ll have ice that’s been made with the cleaning solution. It’s absolutely essential to dispose of this ice. We typically discard the first few batches of ice to ensure no cleaning solution remains. Never use this ice for consumption, as it could contain harmful chemicals. It’s better to be safe than sorry!
Rinsing The Reservoir
Rinsing the reservoir is the final step in the cleaning process. After running the cleaning cycle and disposing of the cleaning ice, we drain the reservoir and refill it with clean water. Then, we run another ice-making cycle to rinse away any remaining cleaning solution. We usually repeat this process a couple of times to ensure the reservoir is completely clean. This step is vital for preventing any lingering taste or odor in your ice.
Reassembling Your Ice Maker
Okay, we’ve cleaned everything, and now it’s time to put the ice maker back together. This part is pretty straightforward, but it’s important to make sure everything is properly in place to avoid any issues down the line. Think of it like putting together a puzzle; each piece has its place.
Putting Back Removable Parts
First things first, let’s get those removable parts back where they belong. This includes the ice basket, the scoop, and any water pans or trays you took out. Make sure they’re all completely dry before you put them back in. We don’t want to introduce any new moisture that could lead to mold or mildew. It’s also a good idea to give them one last wipe down with a clean, dry cloth just to be sure.
Ensuring Proper Fit
This is where a little attention to detail goes a long way. Make sure each part fits snugly and is properly aligned. If something feels forced or doesn’t quite sit right, double-check that you’re putting it in the correct way. Refer back to the manual if you’re unsure. A poorly fitted part can cause leaks, jams, or other problems that could damage your ice maker.
Checking The Drain Plug
Don’t forget about the drain plug! This little guy is crucial for preventing leaks. Make sure it’s securely in place before you start making ice again. Give it a little wiggle to make sure it’s not loose. If the plug is damaged or worn, now is a good time to replace it. A leaky drain plug can make a mess and potentially damage your flooring.
Plugging In The Appliance
Alright, we’re almost there! Now it’s time to plug the ice maker back into the power outlet. Make sure your hands are dry before you do this to avoid any electrical shocks. Once it’s plugged in, give it a few minutes to power up. You should see the indicator lights come on, and you might hear the machine start to hum.
Running A Test Cycle
Before you start making ice for real, it’s a good idea to run a test cycle. This will help you make sure everything is working properly and that the ice maker is producing ice as expected. Just turn the machine on and let it run through a full cycle. Discard the first batch of ice, as it may contain some residual cleaning solution.
Monitoring For Issues
Keep an eye on your ice maker for the first few hours after reassembling it. Listen for any unusual noises, check for leaks, and make sure the ice is forming correctly. If you notice anything out of the ordinary, turn off the machine and troubleshoot the issue before it gets worse. It’s better to catch a small problem early than to deal with a major repair later on.
Reassembling your ice maker is the final step in the cleaning process. Taking your time and paying attention to detail will help ensure that your machine is working properly and producing clean, fresh ice for years to come. If you encounter any problems, don’t hesitate to consult the manual or contact a professional for assistance.
Maintaining Your Ice Maker Regularly
Setting A Cleaning Schedule

We’ve found that the key to a happy ice maker is consistency. Set a recurring reminder on your phone or calendar – whether it’s monthly, quarterly, or bi-annually – to give your ice maker the attention it deserves. Regular cleaning prevents buildup and keeps your ice tasting fresh. It’s a small investment of time that pays off big in the long run.
Signs Your Ice Maker Needs Cleaning
How do we know when it’s time to clean? Well, the ice maker will tell us! Keep an eye out for these telltale signs:
- Cloudy or misshapen ice cubes
- A strange taste or odor in the ice
- Visible mold or mildew
- Slower ice production
- Unusual noises during the operation
If we notice any of these, it’s time to roll up our sleeves and get cleaning. Don’t wait for the problems to get worse!
Daily Maintenance Tips
Daily maintenance can seem like a chore, but it’s actually super simple. We make it a habit to:
- Wipe down the exterior with a damp cloth.
- Empty the ice bin regularly to prevent clumping.
- Check for any spills or leaks around the unit.
These small actions can significantly extend the life of our ice maker and keep it running smoothly. It’s all about preventing problems before they start.
Weekly Checks
Once a week, we take a few extra minutes to give the ice maker a more thorough look. This includes:
- Inspecting the water lines for any signs of leaks or damage.
- Checking the ice scoop for cleanliness.
- Make sure the air vents are free from dust and debris.
Seasonal Deep Cleaning
Every season, we dedicate a bit more time for a deep clean. This involves: cleaning tools and kits to make the job easier.
- Unplugging the ice maker and disassembling removable parts.
- Cleaning all interior surfaces with a mild cleaning solution.
- Rinsing thoroughly and drying completely before reassembling.
- Replacing the water filter, if applicable.
Keeping A Cleaning Log
It might sound a bit over the top, but keeping a simple cleaning log can be really helpful. We just jot down the date of each cleaning, what we did, and any issues we noticed. This helps us track our progress and identify any recurring problems. Plus, it’s satisfying to see how well we’re taking care of our ice maker!
Troubleshooting Common Ice Maker Issues
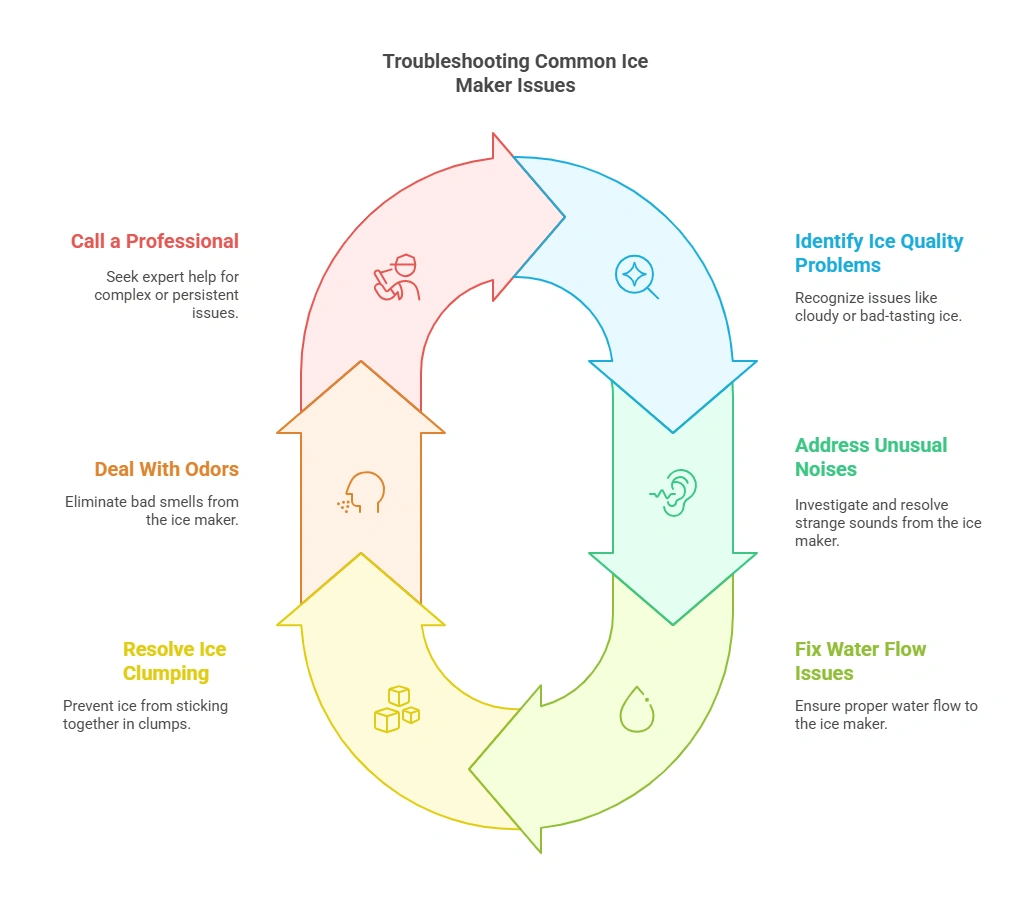
Identifying Ice Quality Problems
We’ve all been there – you reach for ice, and something’s just off. Maybe it tastes weird, looks cloudy, or melts way too fast. These are all signs that something isn’t right with your ice maker. Let’s break down some common ice quality issues and what they might mean:
- Cloudy Ice: Often caused by trapped air or minerals in the water. Using filtered water can help.
- Soft or Mushy Ice: This could indicate a temperature problem. Check your freezer settings.
- Bad Taste or Odor: A telltale sign of mold, bacteria, or old ice. Time for a cleaning!
Addressing Unusual Noises
Is your ice maker suddenly sounding like a construction site? Strange noises are never a good sign. Here’s a quick guide:
- Loud Buzzing: This could be a motor issue or a frozen water line.
- Grinding: This might indicate a problem with the ice harvesting mechanism.
- Rattling: Loose parts could be the culprit. Time to inspect the unit.
If the noises persist after a quick check, it might be time to call in a professional. Don’t ignore those unusual noises!
Fixing Water Flow Issues
No water, no ice! Water flow problems are a common headache. Here’s what to check:
- Check the Water Line: Make sure it’s properly connected and not kinked.
- Inspect the Water Inlet Valve: This valve controls the water flow into the ice maker. If it’s faulty, it might need replacing.
- Look for Freezes: Frozen water lines can block the flow. Try thawing them out gently.
A simple way to prevent water flow issues is to regularly check and clean the water filter (if your ice maker has one). A clogged filter can significantly reduce water pressure.
Resolving Ice Clumping
Nobody likes a giant ice brick! Clumping happens when ice melts slightly and then refreezes. Here’s how to tackle it:
- Temperature Check: Ensure your freezer is cold enough.
- Proper Storage: Store ice in airtight bags to prevent melting and refreezing.
- Regular Use: Use the ice regularly to prevent it from sitting too long.
Dealing With Odors
Is that funky smell coming from your ice maker? Yuck! Odors usually mean bacteria or mold are present. Here’s your odor-busting plan:
- Thorough Cleaning: Use a cleaning solution specifically designed for ice makers.
- Baking Soda: Place an open box of baking soda inside the ice maker to absorb odors.
- Regular Maintenance: Clean your ice maker every 3-6 months to prevent odors from developing.
When To Call A Professional
Sometimes, DIY just isn’t enough. If you’ve tried the basic troubleshooting steps and your ice maker is still acting up, it’s time to call a professional. Here are some situations where professional help is needed:
- Complex Repairs: If you suspect a major component is broken (like the compressor or motor).
- Electrical Issues: Never mess with electrical components unless you’re qualified.
- Persistent Problems: If the same issue keeps recurring despite your best efforts.
Don’t be afraid to seek help! A professional can diagnose and fix the problem quickly and safely, saving you time and frustration. Plus, they can offer tips on ice maker maintenance to prevent future issues.
Ice Maker Components
Key Parts Of An Ice Maker
When we talk about ice makers, it’s easy to just think of them as a single unit. But really, they’re made up of several important parts that all work together. Understanding these components can help us troubleshoot issues and maintain our machines better. The main parts include the water inlet valve, the ice mold, the thermostat, the ejector mechanism (whether it’s blades or a flexible tray), and the ice bin. Each has a specific job to do in the ice-making process.
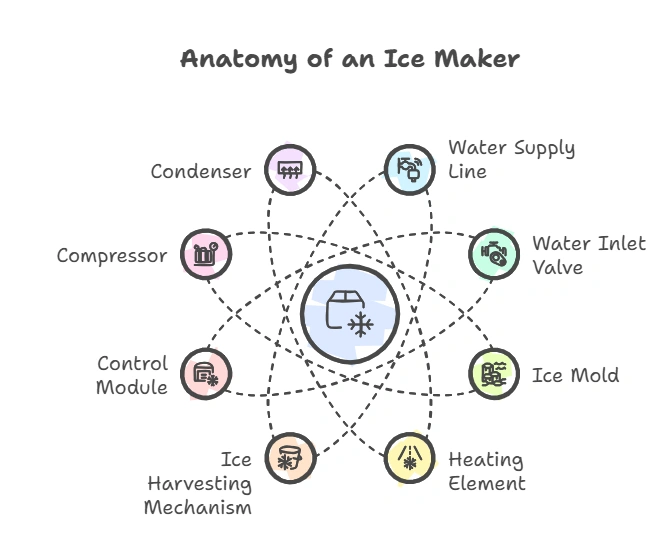
How Each Part Works
Each component plays a vital role. The water inlet valve controls the flow of water into the ice maker. The ice mold is where the water freezes into ice cubes. The thermostat monitors the temperature, signaling when the ice is frozen and ready to be harvested. Then, the ejector blades or flex tray motor pushes the ice out of the mold and into the ice bin. It’s a pretty neat system when you break it down.
Importance Of Each Component
If any of these parts fail, the whole ice-making process can grind to a halt. A faulty water valve might not let water in, or it might leak. A bad thermostat could cause the ice maker to not freeze properly. A broken ejector means the ice stays stuck in the mold. The ice bin is important, too, as it stores the ice and keeps it from melting too quickly. So, each part is essential for reliable ice production.
Common Issues By Part
Knowing the common problems can help us diagnose issues quickly. Water valves can get clogged or fail electrically. Ice molds can develop cracks or mineral buildup. Thermostats can become inaccurate. Ejector mechanisms can break or get jammed. Ice bins can sometimes crack or not sit properly, causing temperature issues. Recognizing these potential problems is half the battle.
Replacement Options
Thankfully, most of these parts can be replaced if they fail. You can often find replacement water valves, thermostats, and ejector motors online or at appliance repair stores. Make sure to get the right part for your specific ice maker model. Sometimes, it’s a simple DIY fix, but other times, it might be best to call a professional. Don’t forget to check the ice maker components before calling a professional.
Upgrading Your Ice Maker
While repairing is important, we can also think about upgrades. Some newer ice makers have improved water filtration systems, more efficient freezing cycles, or better ice storage solutions. Upgrading can mean fresher ice, faster production, and less maintenance in the long run. It’s something to consider if you’re frequently dealing with ice maker problems.
Keeping our ice maker in top shape means understanding how it works and what can go wrong. Regular cleaning and maintenance are key, but knowing the individual components and their roles can help us troubleshoot and extend the life of our machines.
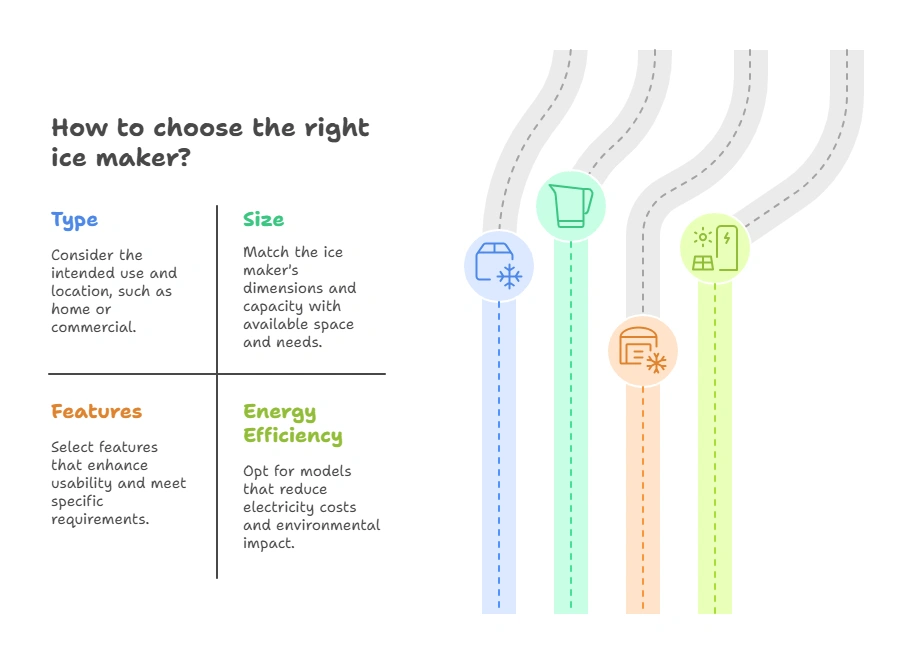
Choosing The Right Ice Maker For Your Needs
Choosing the right ice maker can feel overwhelming, but we’re here to simplify the process. It’s all about understanding your specific needs and matching them with the available options. Let’s break down the key considerations to help you make the best choice.
Types Of Ice Makers
There are several types of ice makers, each designed for different purposes and settings. Countertop ice makers are compact and portable, perfect for home use or small offices. Undercounter ice makers are built into cabinetry, offering a more permanent solution. Then there are modular ice makers, which are high-volume machines often used in commercial settings. Understanding the differences is the first step in finding the right fit. We need to consider where we’ll be using the ice maker and how much ice we typically need.
Size Considerations
Size matters, both in terms of the ice maker’s physical dimensions and its ice production capacity. A compact ice maker might be ideal if space is limited, but it won’t suffice for a large family or frequent entertaining. Conversely, a large, commercial-grade ice maker would be overkill for a small household. Consider the available space and the amount of ice you’ll need on a regular basis.
Features To Look For
Ice makers come with a variety of features, such as self-cleaning functions, different ice cube sizes, and water filtration systems. Some models offer advanced controls and digital displays, while others are more basic. Think about which features are most important to you. Do you want an ice maker that’s easy to maintain? Or are you looking for one that produces gourmet ice? Prioritizing features will help narrow down your options.
Energy Efficiency Ratings
Like any appliance, ice makers vary in their energy consumption. Look for models with high energy efficiency ratings to save money on your electricity bill and reduce your environmental impact. Energy Star-certified ice makers meet strict energy efficiency guidelines set by the EPA. While the initial cost might be higher, the long-term savings can be significant.
Budgeting For An Ice Maker
Ice makers range in price from a few hundred dollars to several thousand, depending on the type, size, and features. Set a budget before you start shopping to avoid overspending. Keep in mind that the cheapest option isn’t always the best value. Consider the long-term costs of maintenance and energy consumption when making your decision.
Brand Recommendations
There are many reputable brands in the ice maker market, each with its own strengths and weaknesses. Some popular brands include Scotsman, Manitowoc, and NewAir. Do some research and read reviews to get a sense of which brands are known for their reliability, performance, and customer support. Don’t be afraid to ask for recommendations from friends or family who own ice makers.
Choosing the right ice maker is a personal decision that depends on your individual needs and preferences. By carefully considering the factors outlined above, you can find an ice maker that will provide you with years of reliable service and delicious ice.
Here’s a quick comparison table of different ice maker types:
| Type | Size | Capacity | Features | Cost |
|---|---|---|---|---|
| Countertop | Small | Low | Portable, easy to use | Low |
| Undercounter | Medium | Medium | Built-in, convenient | Medium |
| Modular | Large | High | High-volume production, commercial use | High |
| Portable Ice Maker | Compact | Low to Medium | Easy to move, various ice cube sizes | Low to Medium |
Exploring Ice Maker Accessories
We often overlook the importance of accessories when it comes to ice makers, but the right tools can really make a difference in how well our machines function and how easy they are to maintain. Let’s take a look at some accessories that can help us keep our ice makers in top shape.
Ice Storage Solutions
Having a good way to store ice is essential, especially if we use a lot of it. Ice storage containers come in various sizes and materials, from insulated bins to portable coolers. These help keep ice frozen longer, prevent it from clumping together, and reduce the need for frequent ice-making.
- Insulated ice bins
- Portable ice coolers
- Freezer ice trays with lids
Cleaning Tools And Kits
Keeping our ice makers clean is a must, and the right tools can make the job easier. Cleaning kits often include brushes, cleaning solutions, and cloths specifically designed for ice makers. These tools help us reach those tricky spots and remove buildup effectively.
- Specialized cleaning brushes
- Ice maker cleaning solutions
- Microfiber cloths
Replacement Filters
Water quality has a big impact on the taste and clarity of our ice. Replacement filters help remove impurities and minerals from the water, leading to better-tasting ice and preventing scale buildup in the machine. It’s a good idea to change these regularly.
- Activated carbon filters
- Sediment filters
- Scale inhibitor filters
Ice Scoops And Buckets
Using a clean ice scoop is important for hygiene. Ice scoops and buckets designed for ice makers help us transfer ice without contaminating it with our hands. Look for scoops made from food-grade materials that are easy to clean.
- Stainless steel ice scoops
- Plastic ice scoops
- Ice buckets with tongs
Maintenance Products
Besides cleaning, there are other maintenance products that can help extend the life of our ice makers. These include descalers, sanitizers, and protective coatings that prevent buildup and keep the machine running smoothly.
- Descaling solutions
- Sanitizing sprays
- Protective coatings
Storage Bags For Ice
If we need to store ice for longer periods or transport it, storage bags are a great option. These bags are usually made from durable, food-grade plastic and help keep the ice frozen and prevent freezer burn.
- Freezer-safe ice bags
- Resealable ice bags
- Insulated ice transport bags
Investing in the right accessories can significantly improve the performance and longevity of our ice makers. From storage solutions to cleaning tools, these items help us maintain a clean, efficient, and hygienic ice-making process. By choosing the right accessories, we can ensure that we always have fresh, clean ice on hand.
Water Quality For Ice Makers
Impact Of Hard Water
Hard water can be a real pain for ice makers. The high mineral content, especially calcium and magnesium, leads to scale buildup inside the machine. This scale not only reduces the efficiency of your ice maker but can also affect the taste and clarity of your ice. Over time, hard water can even damage the internal components, shortening the lifespan of your appliance. We’ve definitely seen the difference in our ice maker’s performance after switching to softer water.
Testing Your Water Quality
It’s a good idea to know what’s in your water. You can buy a simple water testing kit at most hardware stores, or even send a sample to a lab for a more detailed analysis. These tests will tell you the levels of various minerals and contaminants in your water, helping you determine if you need a water softener or filter. We tested our water last year and were surprised by the high mineral content!
Using Water Filters
Water filters are a great way to improve the quality of your ice. There are several types available, from simple pitcher filters to more advanced whole-house filtration systems.
- Pitcher Filters: These are affordable and easy to use, but they require frequent refills.
- Faucet Filters: These attach directly to your faucet and provide filtered water on demand.
- Inline Filters: These are installed in the water line leading to your ice maker, providing a continuous supply of filtered water.
We’ve found that using a filter makes a noticeable difference in the taste and clarity of our ice.
Choosing Filtered Water
If you don’t have a filtration system, using bottled or distilled water is another option. While it can be more expensive in the long run, it ensures that your ice maker is getting the purest water possible. This can help prevent mineral buildup and improve the taste of your ice. We sometimes use distilled water when we want really clear ice for cocktails.
Effects On Ice Taste
Water quality has a huge impact on the taste of your ice. Contaminants and minerals in the water can give your ice an unpleasant flavor. Filtered water, on the other hand, produces clean, crisp-tasting ice that won’t detract from your drinks. We noticed a big improvement in the taste of our ice after we started using a water filter.
Regularly Changing Filters
Don’t forget to change your water filter regularly! A clogged or dirty filter can actually make your water quality worse. Most filters have a recommended replacement schedule, so be sure to follow the manufacturer’s instructions. We set a reminder on our phones to change the filter every six months.
Maintaining good water quality is key to keeping your ice maker running smoothly and producing great-tasting ice. Regular testing, filtration, and filter replacement are all important steps in ensuring the longevity and performance of your appliance.
Tips For Keeping Ice Makers Clean Longer
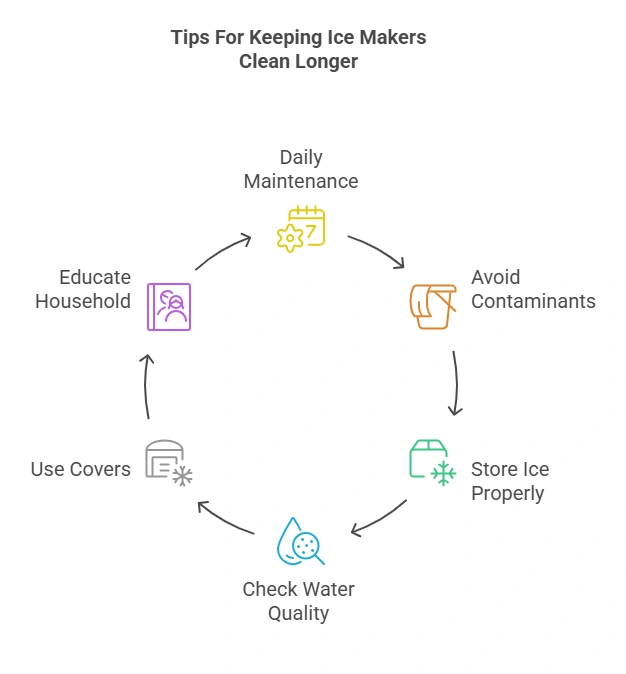
Daily Maintenance Routines
We’ve found that a little effort each day goes a long way. Wiping down the exterior and quickly rinsing the ice scoop can prevent buildup. It’s also a good idea to empty the ice bin regularly, even if it’s not full, to prevent ice from becoming stale or absorbing odors. This simple habit can significantly reduce the need for deep cleaning.
Avoiding Contaminants
One of the easiest ways to keep your ice maker clean is to prevent it from getting dirty in the first place. Always use a clean scoop to remove ice, and avoid touching the ice with your hands. Make sure to store food properly in your freezer to prevent spills and odors from contaminating the ice. Consider using ice maker covers to protect the machine from dust and debris when it’s not in use.
Storing Ice Properly
How we store ice can impact the cleanliness of our ice makers. If you’re not using ice immediately, transfer it to an airtight container or bag in the freezer. This prevents the ice from absorbing odors and flavors from the freezer, which can then be transferred back into the ice maker. It also helps to prevent the ice from clumping together, making it easier to use and reducing the need to chip away at a solid block of ice.
Regularly Checking Water Quality
Water quality plays a huge role in how quickly your ice maker gets dirty. Hard water, for example, can lead to mineral buildup, which can affect the taste of your ice and the performance of your machine. We recommend testing your water regularly and using a water filter to remove impurities. Replacing the filter, as recommended by the manufacturer, is also important.
Using Ice Maker Covers
When the ice maker isn’t in use, especially for extended periods, a cover can be a great investment. It shields the machine from dust, dirt, and other airborne particles that can accumulate over time. This simple step can reduce the frequency of cleaning and keep your ice maker looking and functioning at its best. Plus, it’s an easy way to protect your countertop ice makers from accidental spills or bumps.
Educating Household Members
It’s important to get everyone on board with keeping the ice maker clean. Explain the importance of using a clean scoop, avoiding touching the ice with their hands, and properly storing ice. A little education can go a long way in preventing contamination and keeping your ice maker in top condition.
The Benefits Of Professional Cleaning Services
When To Hire A Professional
Sometimes, tackling an ice maker cleaning job ourselves just isn’t feasible. Maybe we’re too busy, or perhaps the buildup is just too stubborn. That’s when calling in a professional becomes a smart move. Consider professional help if you notice persistent mold or foul odors that won’t go away or if your ice maker is constantly malfunctioning despite your best cleaning efforts. We might also think about it if we’re not comfortable disassembling parts or dealing with cleaning solutions.
What To Expect From Services
When we hire a professional ice maker cleaning service, we can expect a thorough job. They typically start with a detailed inspection to identify any issues. Then, they’ll disassemble the unit, clean each component with specialized solutions, and sanitize everything. Finally, they reassemble the ice maker, test it to ensure it’s working correctly, and offer tips for maintaining it.
Cost Considerations
The cost of professional ice maker cleaning can vary depending on several factors. These include the type of ice maker, its condition, and the service provider’s rates. It’s a good idea to get quotes from a few different companies to compare prices. While it might seem like an added expense, consider the potential savings from preventing costly repairs or replacements down the road.
Finding A Reliable Service
Finding a reliable cleaning service requires a bit of research. We can start by asking for recommendations from friends or family. Online reviews can also provide valuable insights into a company’s reputation and service quality. Make sure to check if the service is licensed and insured. It’s also wise to inquire about their experience with ice makers specifically.
Benefits Of Regular Professional Cleaning
Regular professional cleaning offers several advantages.
- It ensures a deeper, more thorough clean than we might achieve ourselves.
- It can extend the life of our ice maker by preventing buildup and corrosion.
- It helps maintain optimal ice quality and prevents health risks associated with dirty ice.
Professional cleaning can also identify potential problems early on, allowing for timely repairs and preventing more significant issues from developing.
Long-Term Savings
While professional cleaning involves an upfront cost, it can lead to long-term savings. By keeping our ice maker in top condition, we reduce the risk of breakdowns and costly repairs. A well-maintained ice maker also operates more efficiently, saving us money on energy bills. In the long run, investing in professional cleaning can be a financially sound decision.
Learning From Ice Maker User Experiences
We’ve all been there – staring at an ice maker that’s not quite performing as it should. Maybe the ice tastes a little off, or perhaps it’s just not producing enough. That’s why we wanted to share some collective wisdom, drawing from the experiences of everyday ice maker users like ourselves. Let’s learn from each other’s mistakes and successes!
Common Mistakes To Avoid
One of the biggest mistakes we’ve seen is neglecting regular cleaning. It’s easy to forget about the ice maker until there’s a problem, but a little maintenance goes a long way. Other common pitfalls include:
- Using tap water without a filter leads to mineral buildup.
- Overlooking the importance of proper ventilation around the unit.
- Ignoring unusual noises or changes in ice quality until it’s too late.
Success Stories
It’s not all doom and gloom! We’ve also heard some great success stories. For example, Sarah from Ohio swears by using a specialized ice machine cleaner every three months to keep her ice crystal clear. Another user, Mark, found that simply switching to filtered water dramatically improved the taste of his ice. These small changes can make a big difference.
User Tips And Tricks
Here are some practical tips we’ve gathered from fellow ice-maker enthusiasts:
- Regularly wipe down the interior: A quick wipe-down every week can prevent buildup.
- Use distilled vinegar for cleaning: It’s a natural and effective way to remove mineral deposits.
- Check the water line: Make sure it’s not kinked or blocked.
“I used to have constant problems with my ice maker until I started keeping a cleaning log. Now, I know exactly when to clean it and what products work best. It’s been a game-changer!”
Sharing Your Own Experience
We want to hear from you! What tips and tricks have you discovered? What mistakes have you learned from? Share your experiences in the comments below – let’s build a community of ice-maker experts.
Building A Community
Let’s face it, ice makers can be finicky. By sharing our knowledge and experiences, we can help each other troubleshoot problems, find the best cleaning methods, and, ultimately, enjoy better ice. This isn’t just about fixing machines; it’s about building a community of informed users.
Learning From Reviews
Before buying a new ice maker or trying a new cleaning product, take some time to read reviews. Other users can provide valuable insights into the performance, reliability, and ease of use of different models and products. Pay attention to both positive and negative feedback to get a well-rounded perspective.
Staying Informed About Ice Maker Innovations
It’s easy to think that ice makers are a solved problem, but technology keeps marching on! We need to stay up-to-date with the latest advancements to make sure we’re getting the most out of our ice-making experience. From smart features to energy-saving designs, there’s always something new on the horizon. Let’s explore what’s new and exciting in the world of ice makers.
Latest Technology Trends
We’re seeing some really cool stuff in ice maker tech lately. One of the biggest trends is the integration of smart features, allowing us to control our ice makers remotely via apps. This means we can start making ice on our way home from work, or even monitor ice levels from our phones. Another trend is the development of more efficient cooling systems, which use less energy and produce ice faster. Also, keep an eye out for advancements in ice clarity and shape, like the clear ice spheres that are becoming increasingly popular.
Smart Ice Makers
Smart ice makers are changing the game. Imagine being able to schedule ice production, receive alerts when the ice bin is full, or even diagnose potential problems with your machine, all from your smartphone. Some models even integrate with smart home ecosystems, allowing voice control and seamless integration with other appliances. These features not only add convenience but can also help us optimize energy usage and prevent costly repairs. It’s like having a personal ice-making assistant!
Energy Efficient Models
With growing concerns about energy consumption, manufacturers are focusing on creating more energy-efficient ice makers. These models use advanced insulation, improved cooling systems, and smart controls to minimize energy waste. Look for Energy Star-certified models that meet strict energy efficiency guidelines set by the EPA. Investing in an energy-efficient ice maker can save us money on our utility bills and reduce our environmental footprint. Plus, many of these models offer comparable or even better performance than their less efficient counterparts.
User-Friendly Features
Beyond smart technology and energy efficiency, many new ice makers are designed with user-friendliness in mind. This includes features like intuitive control panels, easy-to-clean components, and automatic shut-off functions. Some models even have self-cleaning cycles, which simplify maintenance and prolong the life of the machine. These features make ice-making more convenient and less of a chore, allowing us to enjoy fresh ice without the hassle.
Future Of Ice Making
The future of ice-making looks bright! We can expect to see even more innovation in the coming years, with advancements in areas like ice clarity, shape, and texture. Imagine ice makers that can produce custom ice shapes for cocktails or create perfectly clear ice for a premium drinking experience. We may also see the integration of new technologies like UV sanitization to ensure the ice is always clean and safe. The possibilities are endless, and we’re excited to see what the future holds.
Researching New Products
Staying informed about new ice maker products is easier than ever. We can check out online reviews, read product comparisons, and visit appliance stores to see the latest models in person. Don’t forget to consult with experts and other users to get their opinions and recommendations. By doing our research, we can make informed decisions and choose the ice maker that best meets our needs and preferences. It’s all about finding the perfect balance of features, performance, and value.
Wrapping It Up
Cleaning your ice maker doesn’t have to be a big hassle. Just follow these simple steps, and you’ll have it looking and working like new in no time. Remember, keeping it clean not only helps it run better but also ensures your ice tastes fresh. So, set a reminder to clean it every few months, and you’ll avoid any nasty surprises down the line. Trust me, a little effort goes a long way when it comes to enjoying those cold drinks!
Frequently Asked Questions
Why is it important to clean my ice maker?
Cleaning ice makers is crucial because it prevents bacteria growth and keeps the ice tasting fresh. If you don’t clean it, dirt and minerals can build up and affect your health.
How often should I clean my ice maker?
You should clean your ice maker at least every six months. If you notice any issues, like bad-tasting ice, clean it sooner.
What supplies do I need to clean my ice maker?
You’ll need warm water, mild dish soap, a soft cloth, and possibly a special ice machine cleaner. You can find these at most stores.
Can I use vinegar to clean my ice maker?
Yes, vinegar is a good option for cleaning. Mix it with water to make a cleaning solution.
How do I prepare my ice maker for cleaning?
First, turn off and unplug the machine. Then, remove any ice and water from the reservoir.
What should I do if my ice maker is making strange noises?
Strange noises can mean there’s a problem. Check for ice clogs or loose parts. If the noise continues, it might be time to call a professional.
How can I tell if my ice maker needs cleaning?
If your ice tastes funny, looks cloudy, or if you see mold, it’s time to clean your ice maker.
Is it safe to use harsh chemicals on my ice maker?
No, avoid harsh chemicals as they can damage the machine and contaminate the ice. Stick to mild cleaners.
What should I do with the ice made during the cleaning cycle?
Always discard the ice made during the cleaning cycle to ensure no cleaning solution is left in the ice.
Can I clean the exterior of my ice maker with regular cleaners?
Use a soft cloth and mild soap for the exterior. Avoid abrasive cleaners that can scratch the surface.
How do I maintain my ice maker to keep it clean longer?
Regularly check and clean the water filter, store ice properly, and keep the area around the ice maker clean.
When should I consider hiring a professional for my ice maker?
If you have persistent problems or if the machine isn’t working after you’ve tried cleaning it, a professional can help.